Lecture 07-1: Web Data Pipelines
DATA 503: Fundamentals of Data Engineering
February 25, 2026
Part 1: Web Scraping with Web Scraper
What is Web Scraping?
Web scraping is the process of automatically extracting data from websites. Instead of manually copying and pasting, we write (or configure) tools to do it for us.
Why? Because life is too short to copy 10,000 rows by hand. Your fingers will thank you.
Use Cases for Web Scraping
- Price monitoring (e-commerce, travel)
- Research data collection (academic datasets)
- Job posting aggregation
- Social media analysis
- Building datasets that do not exist as downloads
The Ethics and Legality Disclaimer
Before you go scraping the entire internet:
- Check the site’s
robots.txtfile (e.g.,https://example.com/robots.txt) - Respect rate limits – do not hammer servers
- Check Terms of Service
- Do not scrape personal/private data
- When in doubt, ask. Or just do not do it.
We are responsible data engineers, not chaos agents.
Web Scraper Chrome Extension
What is Web Scraper?
Web Scraper is a free Chrome/Firefox extension that lets you scrape websites without writing code. It uses a point-and-click interface to define what data to extract.
Think of it as “I can not code a spider, but I can click on things.”
Install it from:
After installation, restart your browser (or just use new tabs).
Accessing Web Scraper
- Open Chrome DevTools (
F12orCmd+Opt+Ion Mac) - Look for the Web Scraper tab in DevTools
- If you do not see it, you may need to click the
>>arrows to find it
That is where all the magic happens.
Key Terminology: Sitemap
A Sitemap is your scraping project. It defines:
- Start URL(s) – where the scraping begins
- Selectors – what data to extract and how to navigate
- The overall structure of your scrape
Think of it like a treasure map, except the treasure is data and X marks the CSS selector.
Key Terminology: Selectors
Selectors are the building blocks of your sitemap. Web Scraper has three types:
| Category | Purpose | Examples |
|---|---|---|
| Data extraction | Pull data from elements | Text, Link, Image, Table, HTML |
| Link navigation | Follow links to other pages | Link selector |
| Element grouping | Group related data together | Element selector, Element click |
Key Terminology: Selector Tree
Selectors are organized in a tree structure. The scraper executes them top-down:
Parent selectors define scope. Child selectors extract data within that scope.
Key Terminology: Multiple Records
When a selector has Multiple checked, it means:
- “There are many of these on the page”
- The scraper will iterate through all matching elements
- Each match becomes a separate data row
For example: a product listing page has 25 items. The Element selector with Multiple checked will find all 25.
The Select Tool
Web Scraper’s point-and-click tool:
- Click Select in the selector creation interface
- Yellow highlight = element that will be selected on click
- Red highlight = already selected element
- Click again to deselect
Keyboard shortcuts (after clicking Select):
| Key | Action |
|---|---|
P |
Expand to parent element |
C |
Narrow to child element |
S |
Select without clicking (for dynamic elements) |
Shift |
Select multiple element groups |
Element Preview and Data Preview
Always use these before running a scrape:
- Element Preview – highlights which elements on the page match your selector (visual check)
- Data Preview – shows the actual data that will be extracted (sanity check)
If the preview looks wrong, the scrape will be wrong. Trust the preview.
Pagination with Range URLs
Instead of clicking “Next” 100 times, use range URLs:
| Pattern | Generates |
|---|---|
https://example.com/page/[1-3] |
/page/1, /page/2, /page/3 |
https://example.com/page/[001-100] |
/page/001, /page/002, … (zero-padded) |
https://example.com/page/[0-100:10] |
/page/0, /page/10, /page/20, … |
This is how we handle multi-page scrapes without link selectors for pagination.
Demo: Scraping Discogs
Our Target: Discogs Most Collected Releases
We are going to scrape the Most Collected Releases from Discogs – the world’s largest music database.
We want: artist name, album title, and then we will follow the link to each album’s detail page to grab the average rating and number of ratings. This is a two-level scrape.
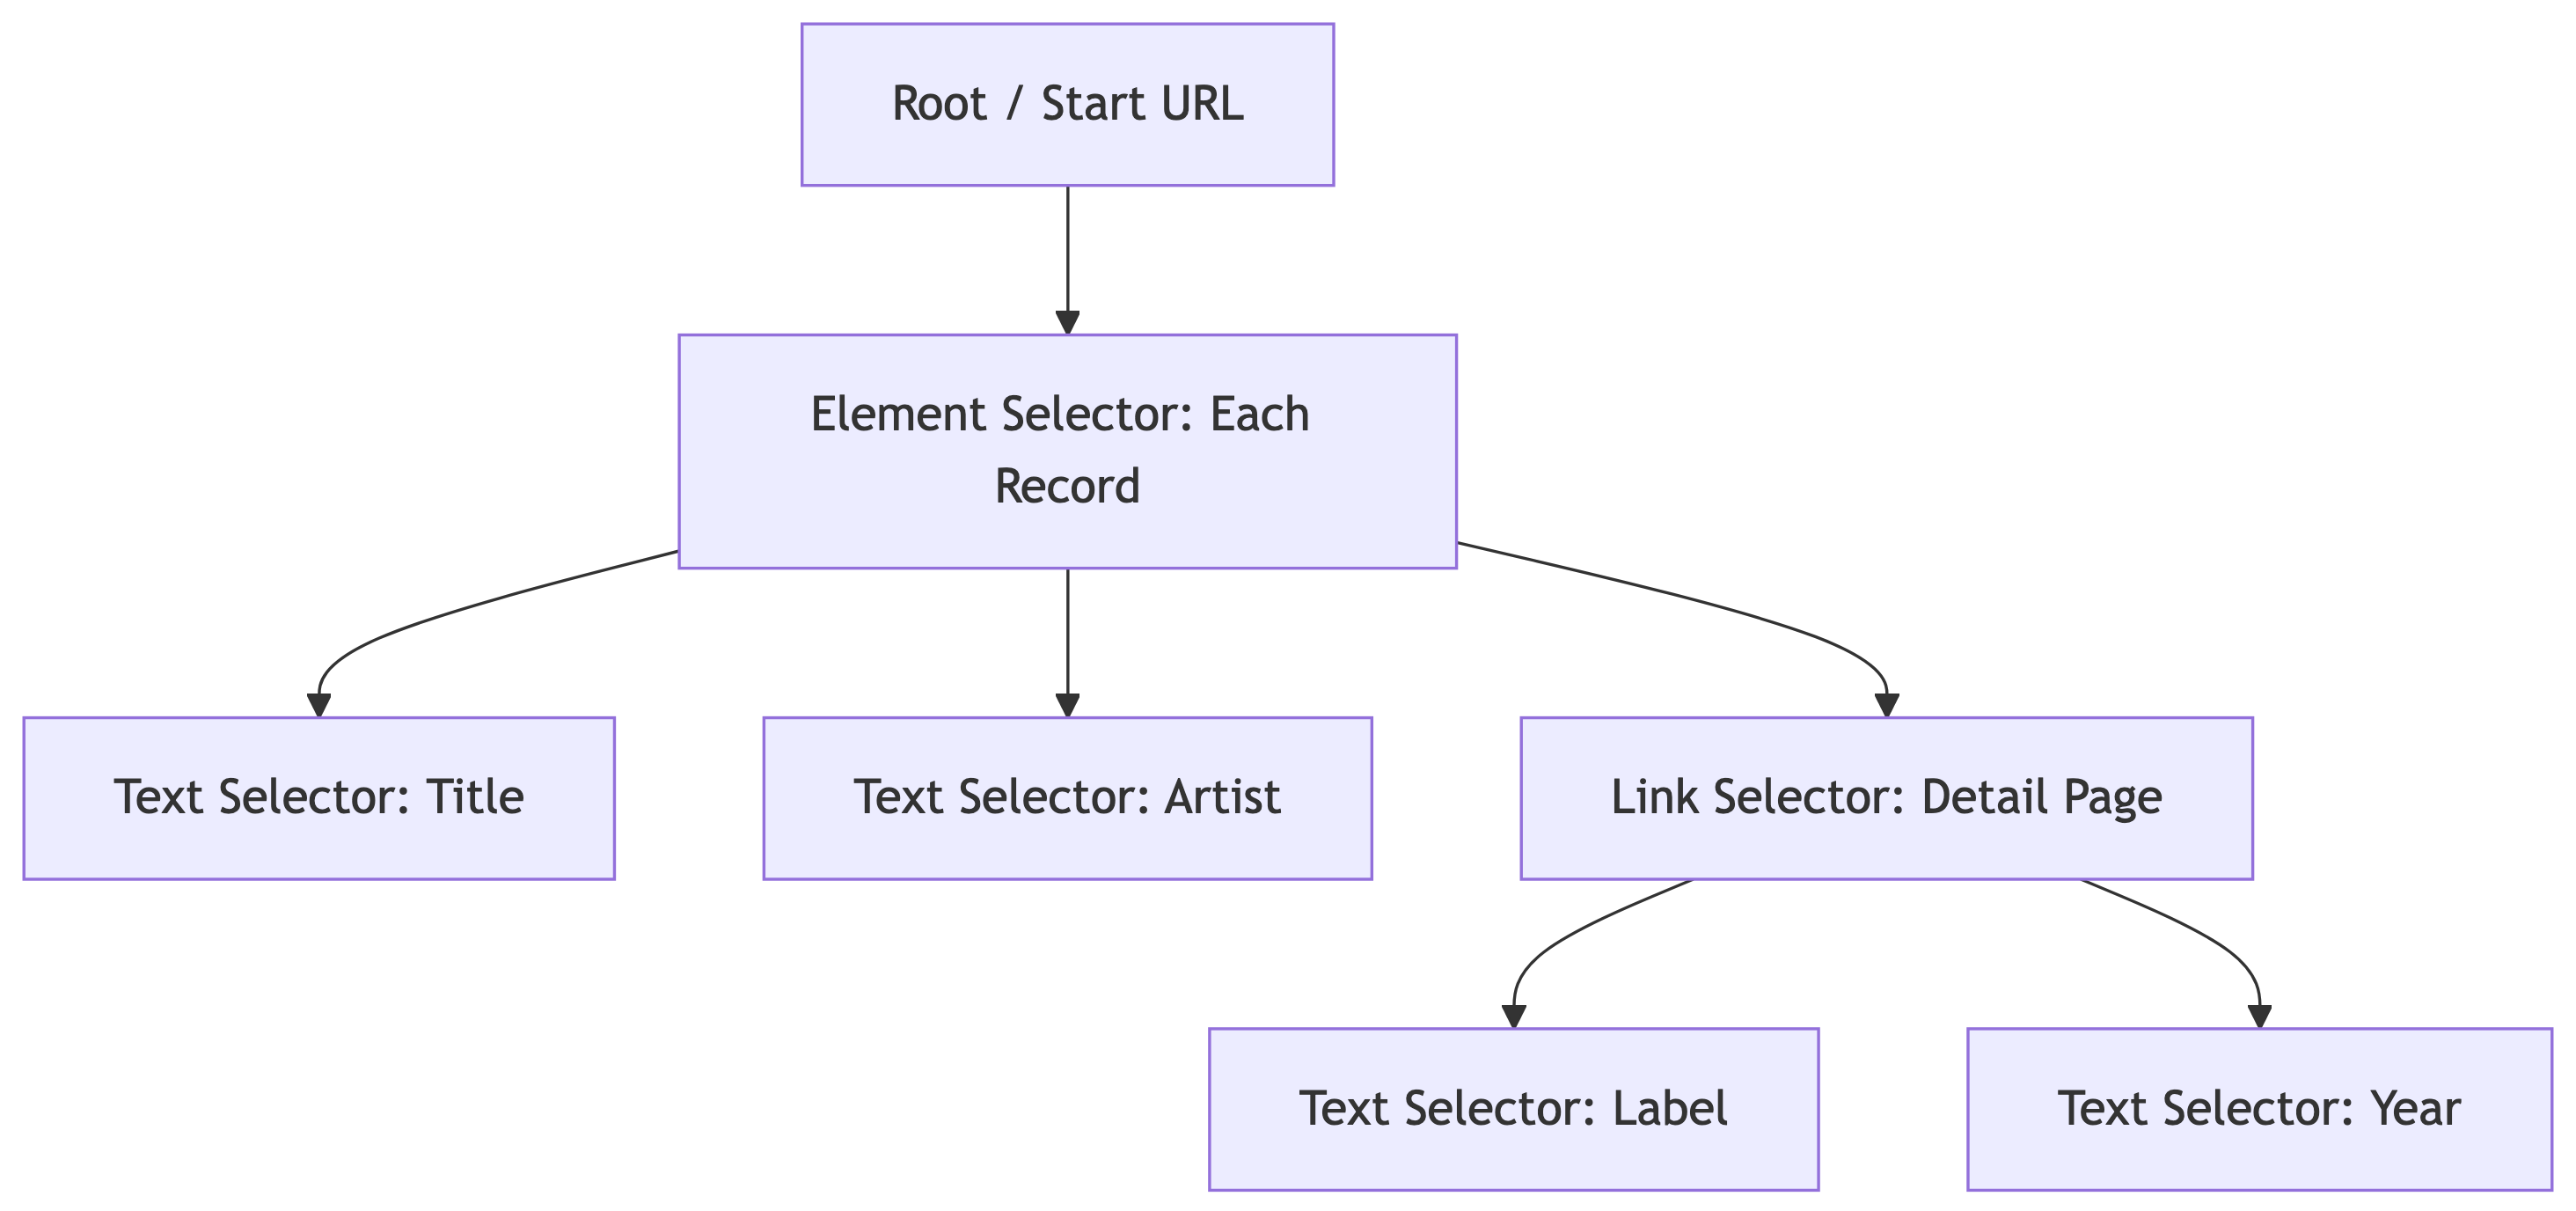
The Sitemap Structure
Our scrape has two levels: the search results page and each album’s detail page:
The pagination selector handles navigating through search result pages. Under it, we extract text (artist, album) and follow links (album_link) to detail pages where we grab ratings.
Step 1: Create a New Sitemap
- Open DevTools (
F12orCmd+Opt+I) and go to the Web Scraper tab - Click Create new sitemap > Create Sitemap
- Sitemap name:
discogs5 - Start URL:
https://www.discogs.com/search?sort=have%2Cdesc&type=release&page=[1-2]
We use [1-2] to scrape the first 2 pages (~50 results). You can increase this later, but start small when testing.
Step 2: Add the Pagination Selector
This handles scrolling or clicking through search results on each page:
- Make sure you are at the **_root** level of selectors
- Click Add new selector
- ID:
pagination - Type: Pagination
- Selector: Click Select, then find and click one of the page navigation arrows/buttons at the bottom of the search results. The CSS selector should resolve to something like
.hidden .cursor-pointer.justify-center span - Pagination type: Auto (the scraper will keep clicking “next” until there are no more pages)
- Click Save selector
Why Pagination instead of Element? The Pagination selector both groups the repeating data on the page AND handles navigating to subsequent pages. It is doing double duty.
Step 3: Add the Artist Text Selector
Navigate into the pagination selector (click on it), then:
- Click Add new selector
- ID:
artist - Type: Text
- Selector: Click Select, then click an artist name in the search results. The CSS selector should be
a.block - Leave Multiple unchecked (one artist per result card)
- Click Save selector
Use Data Preview to verify it is grabbing artist names correctly.
Step 4: Add the Album Text Selector
Still inside the pagination selector:
- Click Add new selector
- ID:
album - Type: Text
- Selector: Click Select, then click an album title. The CSS selector should be
a.line-clamp-2 - Leave Multiple unchecked
- Click Save selector
Data Preview should now show album titles alongside artists.
Step 5: Add the Album Link Selector
This is the key step – we need to follow the link to each album’s detail page to get ratings:
- Still inside
pagination, click Add new selector - ID:
album_link - Type: Link
- Selector: Click Select, then click the album card/link area. The CSS selector should be
a.group - Check Multiple (there are many album links per page)
- Link type: linkFromHref
- Click Save selector
This tells the scraper: “For each result on the page, follow this link to the detail page.” The child selectors under album_link will extract data from those detail pages.
Step 6: Add Detail Page Selectors
Navigate into the album_link selector. Now we define what to extract from each album’s detail page.
Average Rating:
- Click Add new selector
- ID:
avg_rating - Type: Text
- Selector: Navigate to any album detail page manually to build this selector. Find the average rating value. The CSS selector should be
.section_Odw8o div div ul:nth-of-type(1) span:nth-of-type(2) - Click Save selector
Number of Ratings:
- Click Add new selector
- ID:
num_ratings - Type: Text
- Selector: Find the total number of ratings on the detail page. The CSS selector should be
#release-stats li:nth-of-type(4) a - Click Save selector
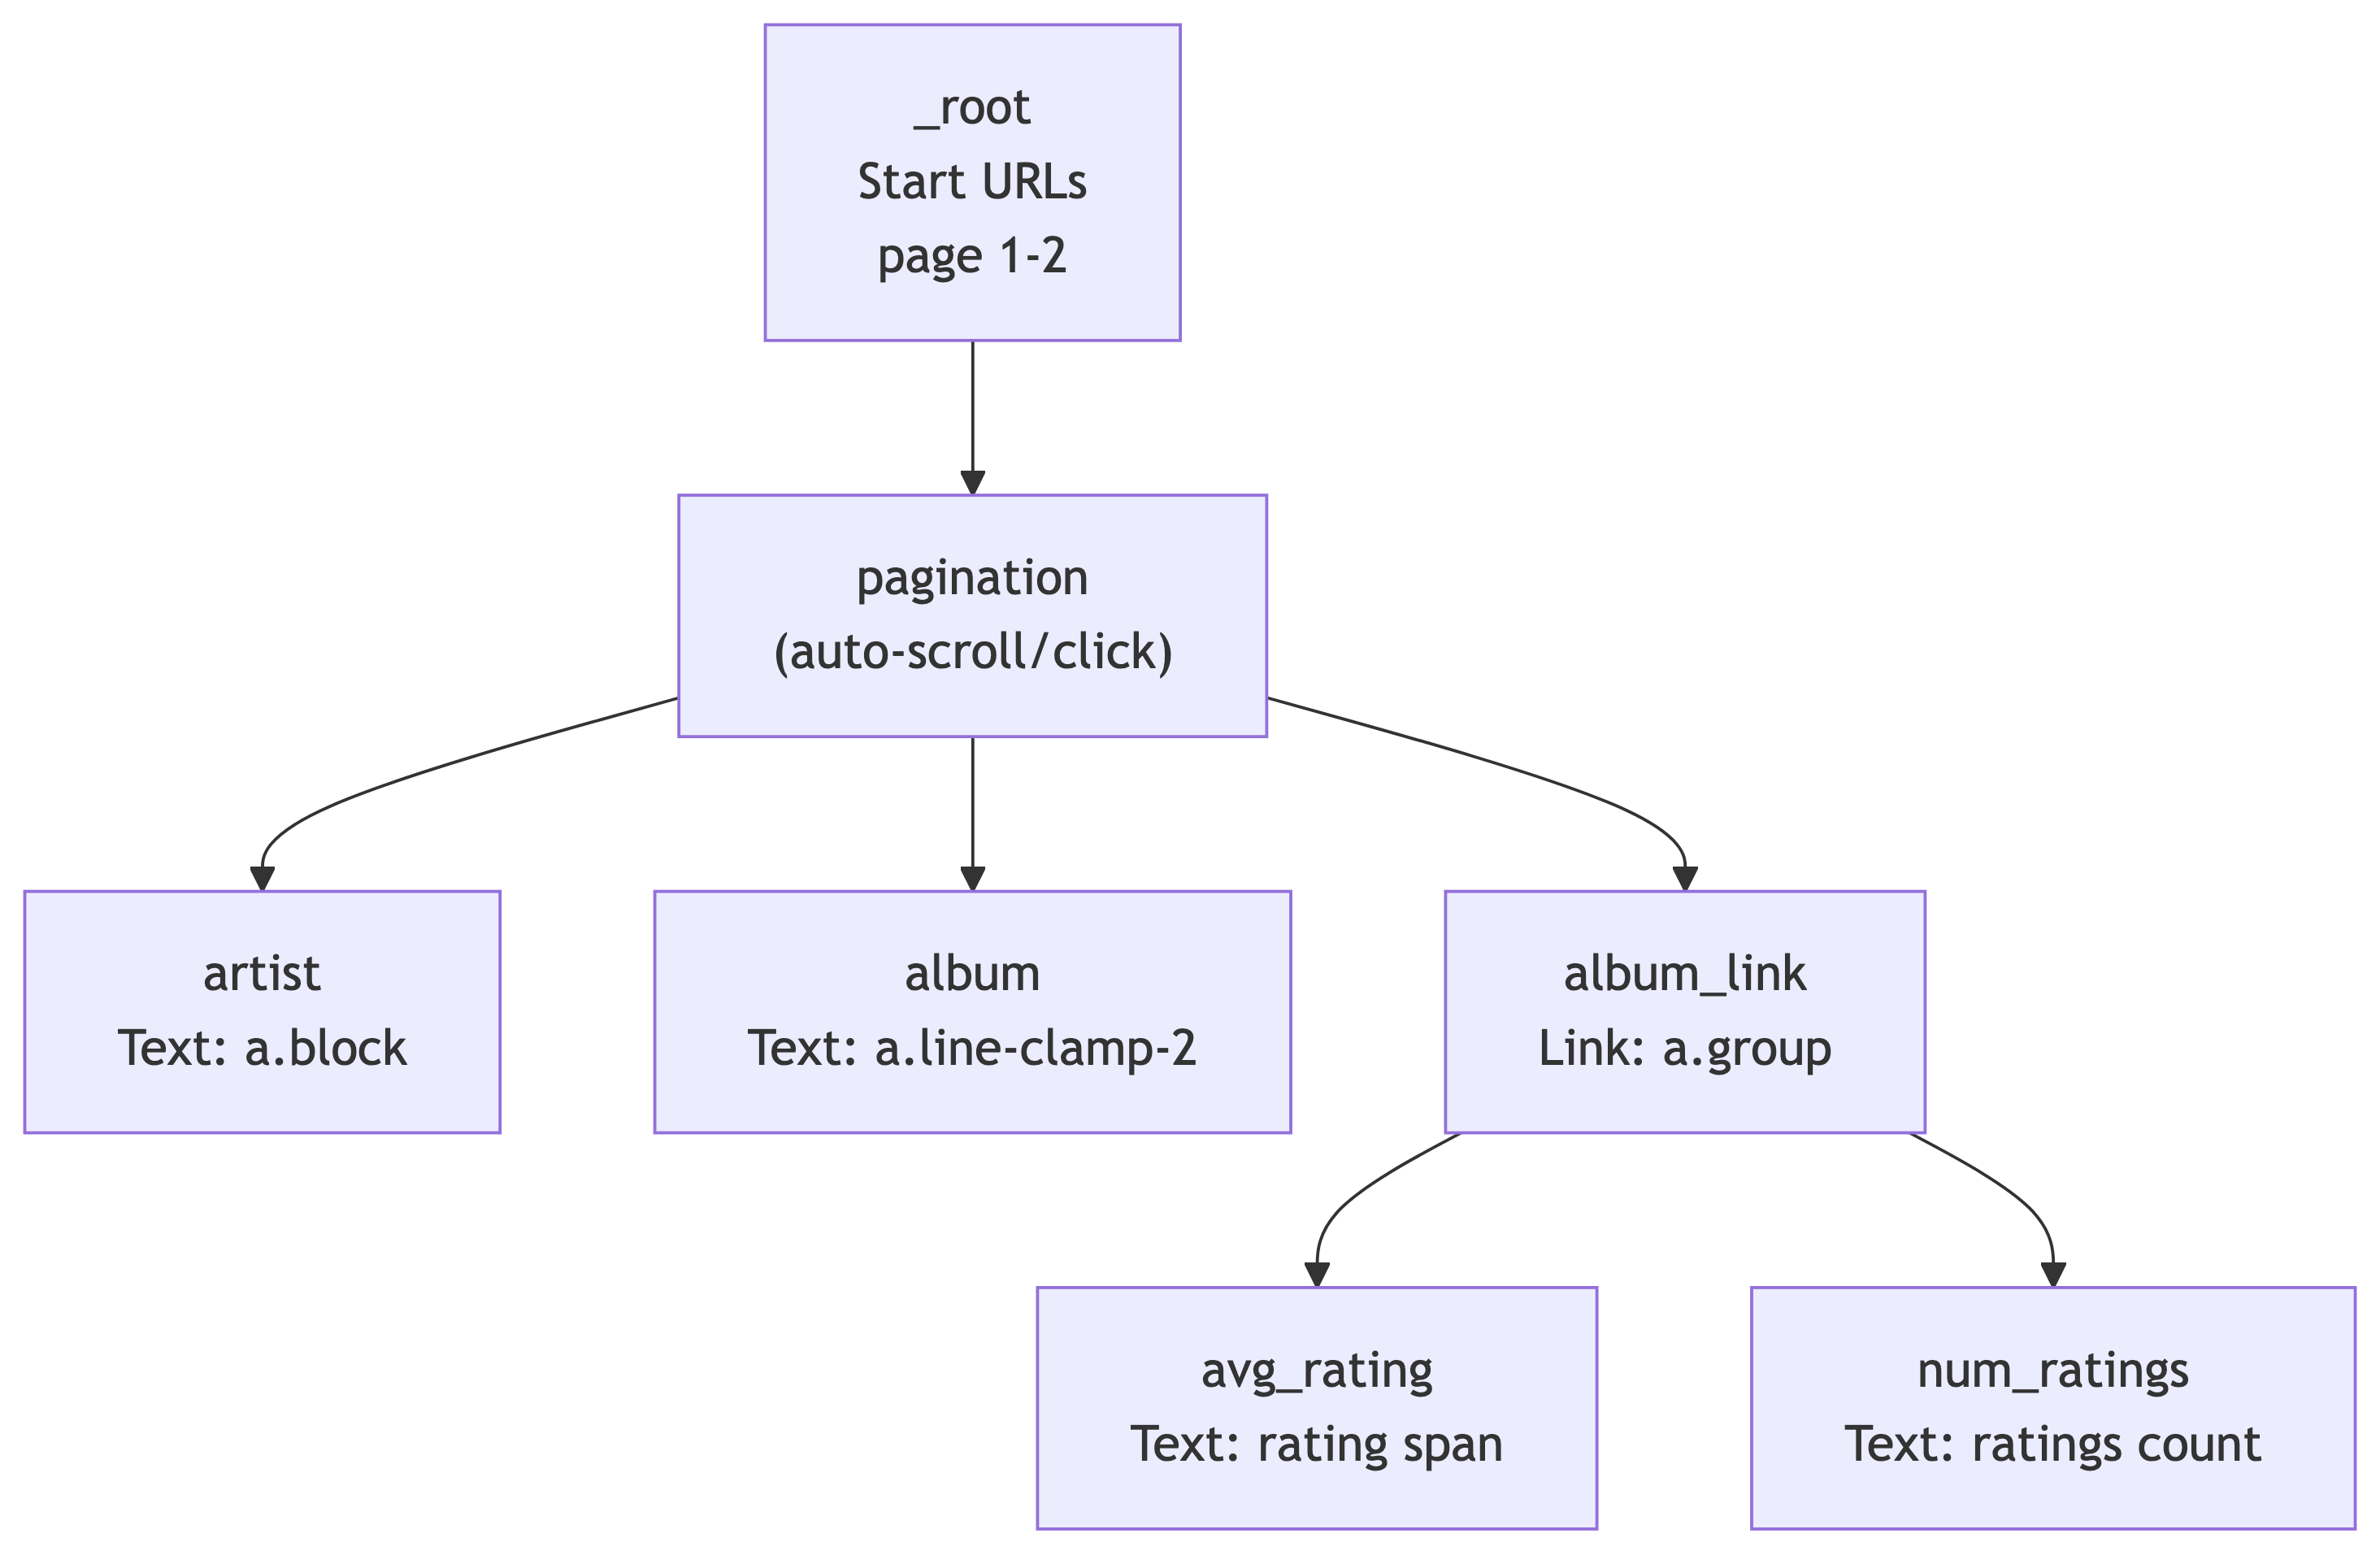
The Complete Selector Tree
Your sitemap should now look like this:
| Selector ID | Type | Parent | CSS Selector |
|---|---|---|---|
pagination |
Pagination | _root |
.hidden .cursor-pointer.justify-center span |
artist |
Text | pagination |
a.block |
album |
Text | pagination |
a.line-clamp-2 |
album_link |
Link | pagination |
a.group |
avg_rating |
Text | album_link |
.section_Odw8o div div ul:nth-of-type(1) span:nth-of-type(2) |
num_ratings |
Text | album_link |
#release-stats li:nth-of-type(4) a |
Importing the Sitemap Directly
If you prefer to skip building it manually, you can import the complete sitemap JSON:
- Go to the Web Scraper tab in DevTools
- Click Create new sitemap > Import Sitemap
- Paste this JSON and click Import:
{
  "_id": "discogs5",
  "startUrl": [
    "https://www.discogs.com/search?sort=have%2Cdesc&type=release&page=[1-2]"
  ],
  "selectors": [
    {
      "id": "pagination",
      "paginationType": "auto",
      "parentSelectors": ["_root", "", "pagination"],
      "selector": ".hidden .cursor-pointer.justify-center span",
      "type": "SelectorPagination"
    },
    {
      "id": "artist",
      "multiple": false,
      "parentSelectors": ["pagination"],
      "selector": "a.block",
      "type": "SelectorText",
      "version": 2
    },
    {
      "id": "album",
      "multiple": false,
      "parentSelectors": ["pagination"],
      "selector": "a.line-clamp-2",
      "type": "SelectorText",
      "version": 2
    },
    {
      "id": "album_link",
      "linkType": "linkFromHref",
      "multiple": true,
      "parentSelectors": ["pagination"],
      "selector": "a.group",
      "type": "SelectorLink",
      "version": 2
    },
    {
      "id": "avg_rating",
      "multiple": false,
      "parentSelectors": ["album_link"],
      "selector": ".section_Odw8o div div ul:nth-of-type(1) span:nth-of-type(2)",
      "type": "SelectorText",
      "version": 2
    },
    {
      "id": "num_ratings",
      "multiple": false,
      "parentSelectors": ["album_link"],
      "selector": "#release-stats li:nth-of-type(4) a",
      "type": "SelectorText",
      "version": 2
    }
  ]
}
Step 7: Preview and Validate
Before running the full scrape, always check:
- Click Element preview on each selector – are the correct elements highlighted?
- Click Data preview on
artistandalbum– do they show real artist/album names? - Navigate to a detail page manually and test
avg_ratingandnum_ratingselement previews there
If the preview looks wrong, the scrape will be wrong. Trust the preview.
Step 8: Run the Scrape
- Click Scrape in the Sitemap menu
- Set Request interval: 2000ms (be polite to Discogs servers)
- Set Page load delay: 2000ms
- Click Start scraping
A popup window will open and start loading pages. It will visit each search results page, extract artist/album names, then follow each album link to grab ratings from the detail pages. Do not close the popup. Go get coffee – this is a two-level scrape so it takes longer than a single-page scrape.
Step 9: Export the Data
Once scraping is complete:
- Click Browse to preview scraped data
- Click Export data as CSV
- Save the file – this is your raw dataset
Congratulations, you just built a two-level scraping pipeline with zero code. You scraped search results AND followed links to detail pages for extra data. Your future self who has to write Python scrapers will be jealous.
What We Scraped
| Field | Source | Description |
|---|---|---|
artist |
Search results page | Artist or band name |
album |
Search results page | Album/release title |
album_link |
Search results page | URL to the album detail page |
avg_rating |
Album detail page | Average user rating (e.g., 4.21) |
num_ratings |
Album detail page | Total number of user ratings |
This is our raw data. In a real pipeline, we would clean, transform, and load this into a database. Which is exactly what we are about to learn.
In-Class Exercise: Top Vinyl of the 2010s
Your Turn: Scrape the Top 200 Vinyl Releases of 2010-2020
Work individually or with a neighbor. You are going to build your own sitemap from scratch using what we just learned.
The Use Case: Discogs tracks which releases are the most collected by users worldwide. We want to find the most collected vinyl releases from the 2010s decade and pull rating data from each album’s detail page.
The Search URL
Start with this base URL in your browser:
https://www.discogs.com/search?sort=have%2Cdesc&type=release&year1=2010&year2=2020&format_exact=VinylThis applies the following filters:
| Filter | Value |
|---|---|
| Sort | Most Collected (have, descending) |
| Type | Release |
| Year Range | 2010 to 2020 |
| Format | Vinyl |
Open this URL in Chrome and verify you see vinyl releases sorted by collector count.
Your Task
Build a Web Scraper sitemap that:
- Paginates through the first 4 pages of results (~100 releases)
- Extracts the artist name and album title from each search result
- Follows the link to each album’s detail page
- Extracts the average rating and number of ratings from the detail page
Bonus fields (if you finish early):
- Year and format info from the search results page
- “Have” count and “Want” count from the detail page
Hints
- Your sitemap structure should look very similar to the
discogs5demo we just built - Use a Pagination selector at the root level
- Use a Link selector to navigate to detail pages
- Use the Select tool and Data Preview to verify each selector before moving on
- If a CSS selector does not work, try using
P(parent) orC(child) keys while the Select tool is active
Expected Output
When you export to CSV, each row should have:
| Column | Example Value |
|---|---|
artist |
Adele |
album |
21 |
album_link |
https://www.discogs.com/release/… |
avg_rating |
4.18 |
num_ratings |
1,247 |
You have 15 minutes. When you are done (or stuck), we will compare sitemaps.
Solution: The Complete Sitemap
Here is a working sitemap for this exercise. You can import it via Create new sitemap > Import Sitemap:
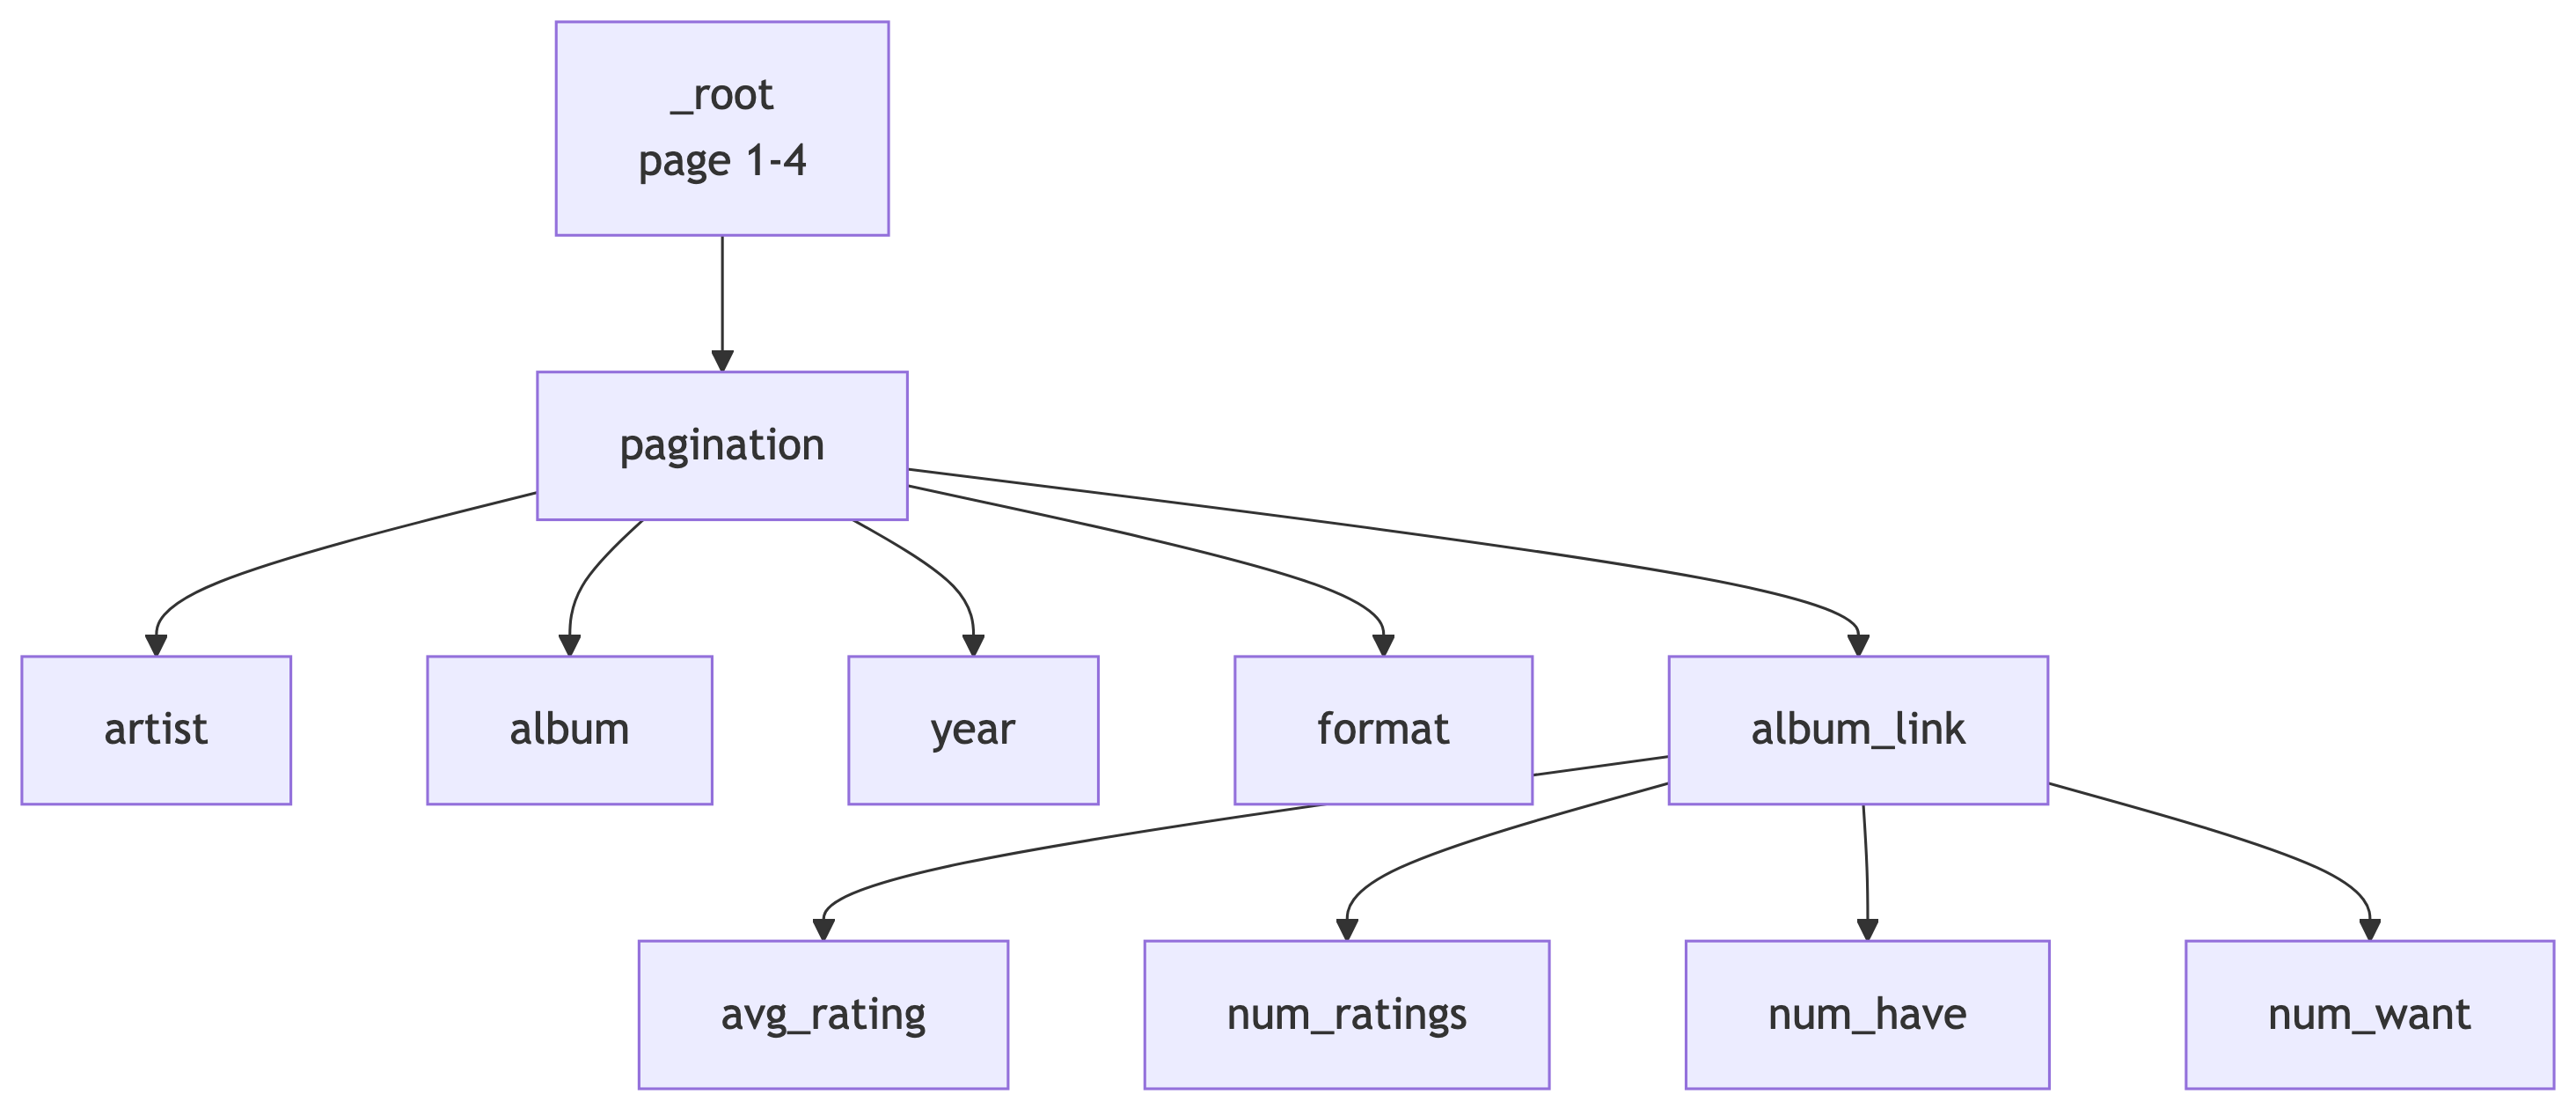
The solution sitemap JSON is available as top100_2010-2020.json on the course site.
| Selector ID | Type | Parent | CSS Selector |
|---|---|---|---|
pagination |
Pagination | _root |
.hidden .cursor-pointer.justify-center span |
artist |
Text | pagination |
a.block |
album |
Text | pagination |
a.line-clamp-2 |
year |
Text | pagination |
span.block.text-xs |
format |
Text | pagination |
p.text-xs.truncate |
album_link |
Link | pagination |
a.group |
avg_rating |
Text | album_link |
.section_Odw8o div div ul:nth-of-type(1) span:nth-of-type(2) |
num_ratings |
Text | album_link |
#release-stats li:nth-of-type(4) a |
num_have |
Text | album_link |
#release-stats li:nth-of-type(1) a |
num_want |
Text | album_link |
#release-stats li:nth-of-type(2) a |
Part 2: Docker and Deployment
What is Docker? (A Refresher)
The Problem Docker Solves
“It works on my machine.” – Every developer, moments before disaster.
Docker packages your application and all its dependencies into a container – a lightweight, portable, isolated environment that runs the same everywhere.
Key Docker Concepts
| Concept | What It Is | Analogy |
|---|---|---|
| Image | A blueprint/recipe for your container | A shipping manifest |
| Container | A running instance of an image | The actual shipping container |
| Registry | Where images are stored (Docker Hub) | The warehouse |
| Dockerfile | Instructions to build an image | The recipe card |
Why Docker for Data Pipelines?
- Reproducibility – same environment everywhere
- Isolation – services do not interfere with each other
- Scalability – spin up more containers as needed
- Deployment – push an image, deploy anywhere
- Scheduling – run containers on a cron schedule (ingest every 5 min!)
Docker turns “how do I deploy this?” from a week-long saga into a one-liner.
Our Docker Image: lucascordova/web2db
We will use a pre-built Docker image called lucascordova/web2db.
This image:
- Fetches data from a URL (any API or web endpoint)
- Stores the raw JSON response in a PostgreSQL table
- Runs once per execution (designed for cron scheduling)
Environment variables control its behavior – no code changes needed:
| Variable | Purpose |
|---|---|
SITE_URL |
The URL to fetch data from |
DATABASE_URL |
PostgreSQL connection string |
TABLE_NAME |
Which table to insert into |
DEBUG |
Enable verbose logging |
Part 3: Pipeline Architecture
The Big Picture
Our Pipeline
We are building an end-to-end data engineering pipeline:

Seven services, one Railway project, zero hand-waving. Let us build each one.
Stage 1: Database Service Setup
Overview
The Central Knowledge Repository
In this pipeline, Postgres is the brain. Everything flows into it and everything reads from it.
It serves a dual role:
- Raw Data Storage – capturing unstructured API responses as JSON blobs
- Structured Relational Modeling – clean, normalized tables ready for querying
We will deploy it on Railway and connect using Beekeeper Studio.
Prerequisites
What You Need Before Starting
- A GitHub account
- A Railway account with Hobby tier access ($5 credit deposit with a credit card)
- Beekeeper Studio installed on your computer
Beekeeper Studio is an open-source desktop SQL client. It is like pgAdmin but prettier and less likely to make you cry.
Setting Up Postgres on Railway
Step 1: Create a New Railway Project
- Log in at railway.app
- Click “New Project”
- Select “Blank Project”
- Name your project (e.g.,
discogs-pipeline)
Step 2: Add a Postgres Database
- In your project dashboard, click “New” to add a service
- Choose “Database”, then click “PostgreSQL”
- Railway will provision your database automatically
This database becomes the shared backend for all services in your pipeline.
Step 3: Get Your Connection URL
- Click into the Postgres service
- Open the Variables tab
- Copy the
DATABASE_PUBLIC_URL
It looks something like:
postgresql://postgres:<password>@<server>.proxy.rlwy.net:20848/railwayThis is your golden ticket. Guard it like a secret.
Connecting with Beekeeper Studio
Step 4: Connect from Beekeeper
- Open Beekeeper Studio and click “New Connection”
- Choose PostgreSQL
- Click “Import from URL”
- Paste the
DATABASE_PUBLIC_URL - Click “Connect”
You should see an empty database. That is expected – your ingestion services will fill it up shortly.
Creating Raw Storage Tables
Step 5: Create Tables for Raw JSON
Before ingestion can begin, we need tables to hold the raw API responses. These are append-only logs: full JSON payloads with timestamps.
Paste this SQL into Beekeeper Studio and execute it.
Why JSONB?
JSONBstores JSON in a binary format – faster to query thanJSON- Supports indexing, containment operators (
@>), and path queries (->,->>) - Perfect for storing raw API responses where the schema might vary
We store the raw data first, ask questions later. This is the ELT pattern (Extract, Load, Transform) rather than ETL.
Stage 2: Data Ingestion with web2db
Flight Data Ingestion
Overview
The web2db service fetches data from a URL and stores the JSON response in Postgres. We will deploy it as a Docker container on Railway with a cron schedule.
First up: flight data from the OpenSky Network API.
Understanding the API URL
https://opensky-network.org/api/states/all?lamin=45.08&lomin=-123.50&lamax=45.88&lomax=-122.00| Parameter | Value | Meaning |
|---|---|---|
lamin |
45.08 | Latitude minimum |
lamax |
45.88 | Latitude maximum |
lomin |
-123.50 | Longitude minimum |
lomax |
-122.00 | Longitude maximum |
This bounding box covers the Portland metropolitan area and surrounding airspace. We are basically watching planes fly over our heads. Legally.
Deploying the Flight Ingestion Service
- In your Railway project, click “New” > “Deploy from Docker Image”
- Enter the image name:
lucascordova/web2db - Click Deploy
Configure Environment Variables
In the Variables tab, add:
| Key | Value |
|---|---|
SITE_URL |
https://opensky-network.org/api/states/all?lamin=45.08&lomin=-123.50&lamax=45.88&lomax=-122.00 |
DATABASE_URL |
${{Postgres.DATABASE_PUBLIC_URL}} |
TABLE_NAME |
flight_json_data |
DEBUG |
TRUE |
Use Railway’s variable picker to reference the Postgres service directly for DATABASE_URL.
Set Up Cron Scheduling
- Go to the Settings tab
- Scroll to Triggers > click “New Trigger”
- Choose Cron and enter:
*/5 * * * *
This runs the service every 5 minutes.
Cron format: minute hour day month weekday
*/5 = “every 5 minutes”
Bookmark Crontab Guru – it will save your life when writing cron expressions.
Verify the Data
After a few minutes, check in Beekeeper Studio:
If you see rows with timestamps and JSON blobs, you are golden.
Troubleshooting:
- Check Deployments tab for successful completion
- Check Logs tab for debug output
- Verify
SITE_URLandDATABASE_URLfor typos
Weather Data Ingestion
Overview
Same concept, different API. We are pulling weather data for Portland from Open-Meteo.
The Weather API URL
https://api.open-meteo.com/v1/forecast?latitude=45.52&longitude=-122.68¤t=temperature_2m,wind_speed_10m,weathercode| Parameter | Value | Meaning |
|---|---|---|
latitude |
45.52 | Downtown Portland |
longitude |
-122.68 | Downtown Portland |
current |
temperature, wind, weathercode | Current conditions |
Deploy Weather Ingestion
Same steps as flights:
- “New” > “Deploy from Docker Image” >
lucascordova/web2db - Add environment variables:
| Key | Value |
|---|---|
SITE_URL |
https://api.open-meteo.com/v1/forecast?latitude=45.52&longitude=-122.68¤t=temperature_2m,wind_speed_10m,weathercode |
DATABASE_URL |
${{Postgres.DATABASE_PUBLIC_URL}} |
TABLE_NAME |
weather_json_data |
DEBUG |
TRUE |
- Set cron trigger:
*/5 * * * *
Verify Weather Data
You now have two data streams flowing into your database. You are officially a data engineer. Put it on your resume.
Stage 3: Data Transformation
Overview
From Raw to Structured
Raw JSON is great for storage but terrible for analysis. The transformation service:
- Reads raw JSON from the ingestion tables
- Extracts meaningful fields using PostgreSQL JSON functions
- Inserts structured rows into normalized tables
- Deletes processed raw data
This is the “T” in ETL (or the “T” in ELT, depending on your religion).
Understanding the JSON
Inspect Before You Transform
Always look at what you are working with:
OpenSky returns an array of arrays. Open-Meteo returns a nested object. Different APIs, different headaches.
Designing the Physical Schema
Structured Target Tables
CREATE TABLE flights (
    id SERIAL PRIMARY KEY,
    icao24 VARCHAR(10) NOT NULL,
    callsign VARCHAR(10),
    country VARCHAR(64),
    latitude DOUBLE PRECISION,
    longitude DOUBLE PRECISION,
    altitude_meters DOUBLE PRECISION,
    velocity_knots DOUBLE PRECISION,
    heading_degrees DOUBLE PRECISION,
    vertical_rate DOUBLE PRECISION,
    timestamp TIMESTAMPTZ NOT NULL
);
Weather Observation Tables
CREATE TABLE weather_observations (
    id SERIAL PRIMARY KEY,
    latitude DOUBLE PRECISION NOT NULL,
    longitude DOUBLE PRECISION NOT NULL,
    timestamp TIMESTAMPTZ NOT NULL,
    precipitation_mm DOUBLE PRECISION,
    weathercode SMALLINT
);

CREATE TABLE weather_condition (
    code SMALLINT PRIMARY KEY,
    description TEXT
);
Writing the Transformation SQL
What is a Common Table Expression (CTE)?
A CTE is a temporary named result set defined with WITH. It makes complex queries readable:
Think of CTEs as named scratch paper for your query. You break the problem into steps, then combine them.
Flight Transformation
BEGIN;

WITH raw AS (
    SELECT id, timestamptz,
           jsonb_array_elements(raw_json->'states') AS state
    FROM flight_json_data
),
parsed AS (
    SELECT
        state->>0 AS icao24,
        state->>1 AS callsign,
        state->>2 AS country,
        (state->>6)::DOUBLE PRECISION AS longitude,
        (state->>5)::DOUBLE PRECISION AS latitude,
        (state->>7)::DOUBLE PRECISION AS altitude_meters,
        (state->>9)::DOUBLE PRECISION AS velocity_knots,
        (state->>10)::DOUBLE PRECISION AS heading_degrees,
        (state->>11)::DOUBLE PRECISION AS vertical_rate,
        timestamptz
    FROM raw
)
INSERT INTO flights (
    icao24, callsign, country, latitude, longitude,
    altitude_meters, velocity_knots, heading_degrees,
    vertical_rate, timestamp
)
SELECT * FROM parsed;

DELETE FROM flight_json_data;

COMMIT;
Weather Transformation
BEGIN;

WITH raw AS (
    SELECT raw_json, timestamptz
    FROM weather_json_data
),
parsed AS (
    SELECT
        (raw_json->'latitude')::DOUBLE PRECISION AS latitude,
        (raw_json->'longitude')::DOUBLE PRECISION AS longitude,
        (raw_json->'current'->'precipitation')::DOUBLE PRECISION
            AS precipitation_mm,
        (raw_json->'current'->'weathercode')::SMALLINT
            AS weathercode,
        timestamptz AS timestamp
    FROM raw
)
INSERT INTO weather_observations (
    latitude, longitude, precipitation_mm,
    weathercode, timestamp
)
SELECT * FROM parsed;

DELETE FROM weather_json_data;

COMMIT;
Why Transactions?
The BEGIN / COMMIT wrapper ensures atomicity:
- Either all operations succeed, or none of them do
- Prevents partial writes and data corruption
- If the INSERT fails, the DELETE never happens
- Your data stays consistent even when things go wrong
This is not optional. This is how adults write SQL.
Deploying the Transformation Service
Use the GitHub Template
- Go to the db_transform template
- Click “Use this template”
- Name your repo:
weather_flight_db_transform - Create the repository
Add Your SQL
- Open the repo on GitHub
- Edit the
clean.sqlfile (click the pencil icon) - Paste both transformation queries (flights + weather)
- Commit the changes
Deploy on Railway
- Click New > Deploy from GitHub Repo
- Click “Configure GitHub App” to grant Railway access
- Select your
weather_flight_db_transformrepo - Add environment variable:
| Key | Value |
|---|---|
DATABASE_URL |
${{Postgres.DATABASE_PUBLIC_URL}} |
- Set cron trigger:
0 * * * *(runs hourly, at the top of the hour)
Verify the Transformation
After the first cron run:
If you see structured rows, the transformation is working. Raw JSON in, clean tables out. Beautiful.
Stage 4: Dashboard with Grafana
Views: The Foundation
What is a View?
A View is a virtual table based on a SQL query. It does not store data – it runs the query on demand.
Why views are great for dashboards:
- Abstract complex joins behind a simple name
- Reusable by multiple clients (Grafana, APIs, etc.)
- Restrict access to specific data using Postgres roles
- Pre-join and pre-aggregate for efficient visualization
Create the Dashboard View
This view joins flights and weather to answer our research question: Are there “no-fly windows” correlated with weather?
CREATE OR REPLACE VIEW flight_weather AS
SELECT
    f.timestamp,
    f.callsign,
    f.altitude_meters,
    f.velocity_knots,
    f.latitude AS flight_latitude,
    f.longitude AS flight_longitude,
    w.precipitation_mm,
    w.weathercode,
    w.latitude AS weather_latitude,
    w.longitude AS weather_longitude
FROM flights f
JOIN weather_observations w
  ON date_trunc('minute', f.timestamp)
   = date_trunc('minute', w.timestamp)
ORDER BY f.timestamp DESC;
Deploying Grafana
Add the Grafana Template
- In Railway, click “Create” > “Template”
- Search for Grafana
- Select the version by Andre Lademann’s Projects
- Add these environment variables:
| Key | Value |
|---|---|
GF_SECURITY_ADMIN_USER |
grafanareader |
GF_DEFAULT_INSTANCE_NAME |
grafanapg |
GF_SECURITY_ADMIN_PASSWORD |
your-password |
- Leave the 4 pre-configured variables as-is and click Deploy
Enable Serverless Mode
After deployment:
- Go to Grafana service Settings
- Scroll to Serverless
- Toggle Enable Serverless and click Deploy
This makes Grafana sleep when idle and wake on demand. Your wallet will appreciate this.
Securing Database Access
Create a Read-Only Grafana User
Do not give Grafana the keys to the kingdom. Create a restricted user:
This user can only SELECT from the flight_weather view. Nothing else. Principle of least privilege in action.
Connecting Grafana to Postgres
Step 1: Get PGHOST
- Go to your Postgres service in Railway
- Under Environment Variables, copy
PGHOST - It looks like:
postgres.railway.internal
Step 2: Log In to Grafana
- Open your Grafana URL from the Deployments tab
- Log in with the admin credentials you set
Step 3: Add Data Source
- Click Connections > Data Sources
- Search for PostgreSQL
- Fill in:
| Field | Value |
|---|---|
| Host | postgres.railway.internal:5432 |
| Database | railway |
| User | grafanareader |
| Password | your_password |
- Click Save & Test
Creating Your First Dashboard
Build a Visualization
- Go to Home > “Create your first dashboard”
- Click “Add Visualization”
- Select your PostgreSQL data source
- Choose the
flight_weatherview as the table - Add
timestampand a data column (e.g.,altitude_metersorprecipitation_mm) - Click Run Query
- Switch between Table Mode and chart visualizations
You now have a live dashboard powered by your pipeline. Go impress someone.
Grafana Persistence (Addendum)
Making Dashboards Survive Restarts
By default, Grafana stores dashboards in SQLite inside the container. Container restarts = dashboards gone. Let us fix that.
- Create a
grafanadatabase in your Railway Postgres instance (via Beekeeper) - Add these environment variables to the Grafana service:
GF_DATABASE_TYPE=postgres
GF_DATABASE_HOST=postgres.railway.internal:5432
GF_DATABASE_NAME=grafana
GF_DATABASE_USER=postgres
GF_DATABASE_SSL_MODE=disable
GF_DATABASE_PASSWORD=<your-db-password>
GF_SERVER_ROOT_URL=<your-grafana-url>- Redeploy Grafana. Dashboards now persist in Postgres!
Sharing Dashboards Publicly
- On a dashboard, click the Share icon
- Click External Link
- Accept the warning and check the confirmation box
- Copy the external link
- Test in an incognito window
Your dashboard is now publicly viewable. Data storytelling at its finest.
Stage 5: DB API Bridge (PostgREST)
Why an API?
From Database to REST
Dashboards are great for humans. But what about other applications?
PostgREST turns your Postgres database into a RESTful API automatically. No backend code required.
Key features:
- Generates REST endpoints for tables, views, and stored procedures
- Uses PostgreSQL’s native roles for access control
- Lightweight and open-source
Architecture

Deploying PostgREST
Step 1: Create the Service
- Click Create in Railway
- Choose Docker Image
- Enter:
postgrest/postgrest - Click Deploy
Step 2: Configure Networking
- Go to Settings tab
- Under Public Networking, click Generate Domain
- Copy the public URL
- Scroll to Serverless, toggle Enable Serverless, and deploy
Step 3: Set Environment Variables
| Key | Value |
|---|---|
PGRST_DB_ANON_ROLE |
web_anon |
PGRST_DB_SCHEMA |
api |
PGRST_DB_URI |
${{DATABASE_URL}} |
PGRST_OPENAPI_SERVER_PROXY_URI |
<your public hostname> |
Database Permissions for the API
Create a Schema and Role
We expose data through a dedicated api schema with a restricted role:
-- Create the API schema
CREATE SCHEMA IF NOT EXISTS api;

-- Create a view in the API schema
CREATE OR REPLACE VIEW api.general_aviation_weather_view AS
SELECT * FROM flight_weather;

-- Create an anonymous access role
CREATE ROLE web_anon NOLOGIN;
GRANT USAGE ON SCHEMA api TO web_anon;
GRANT SELECT ON api.general_aviation_weather_view
TO web_anon;
Create an Authenticator Role
Instead of connecting as the all-powerful postgres user:
NOINHERIT– cannot directly access anythingLOGIN– can authenticate from PostgRESTGRANT web_anon– can act as the read-only role
Separation of concerns. Even your database roles practice good architecture.
Test the API
Visit your PostgREST URL with the view name appended:
https://<your-domain>.up.railway.app/general_aviation_weather_viewYou should see JSON data. If you do, your database is now a REST API. That was disturbingly easy.
Stage 6: API Developer Portal (Swagger)
Why Swagger?
Self-Documenting APIs
An API without documentation is like a library without a catalog. Swagger UI provides:
- Automatic API documentation from the OpenAPI spec
- Interactive endpoint testing in the browser
- Parameter and response schema visualization
- A shareable portal for API consumers
PostgREST automatically generates an OpenAPI spec. Swagger reads it. They are best friends.
Deploying Swagger UI
Step 1: Create the Service
- In Railway, click Create > New Service
- Select Docker Image
- Enter:
swaggerapi/swagger-ui - Click Deploy
Step 2: Set Environment Variable
| Key | Value |
|---|---|
API_URL |
${{postgrest.PGRST_OPENAPI_SERVER_PROXY_URI}} |
This tells Swagger where to find the OpenAPI spec generated by PostgREST.
Step 3: Generate Public URL
- Go to Settings
- Under Networking, click Generate Domain
- Choose default port: 8080
- Click Deploy
Test It
Open the public URL. You should see the Swagger UI loaded with your API documentation. You can:
- View the
general_aviation_weather_viewendpoint - Expand to see parameters and response schema
- Run test requests directly from the browser
Your API is now self-documenting, testable, and shareable. Chef’s kiss.
Recap: The Full Pipeline
What We Built
From Web to Portal
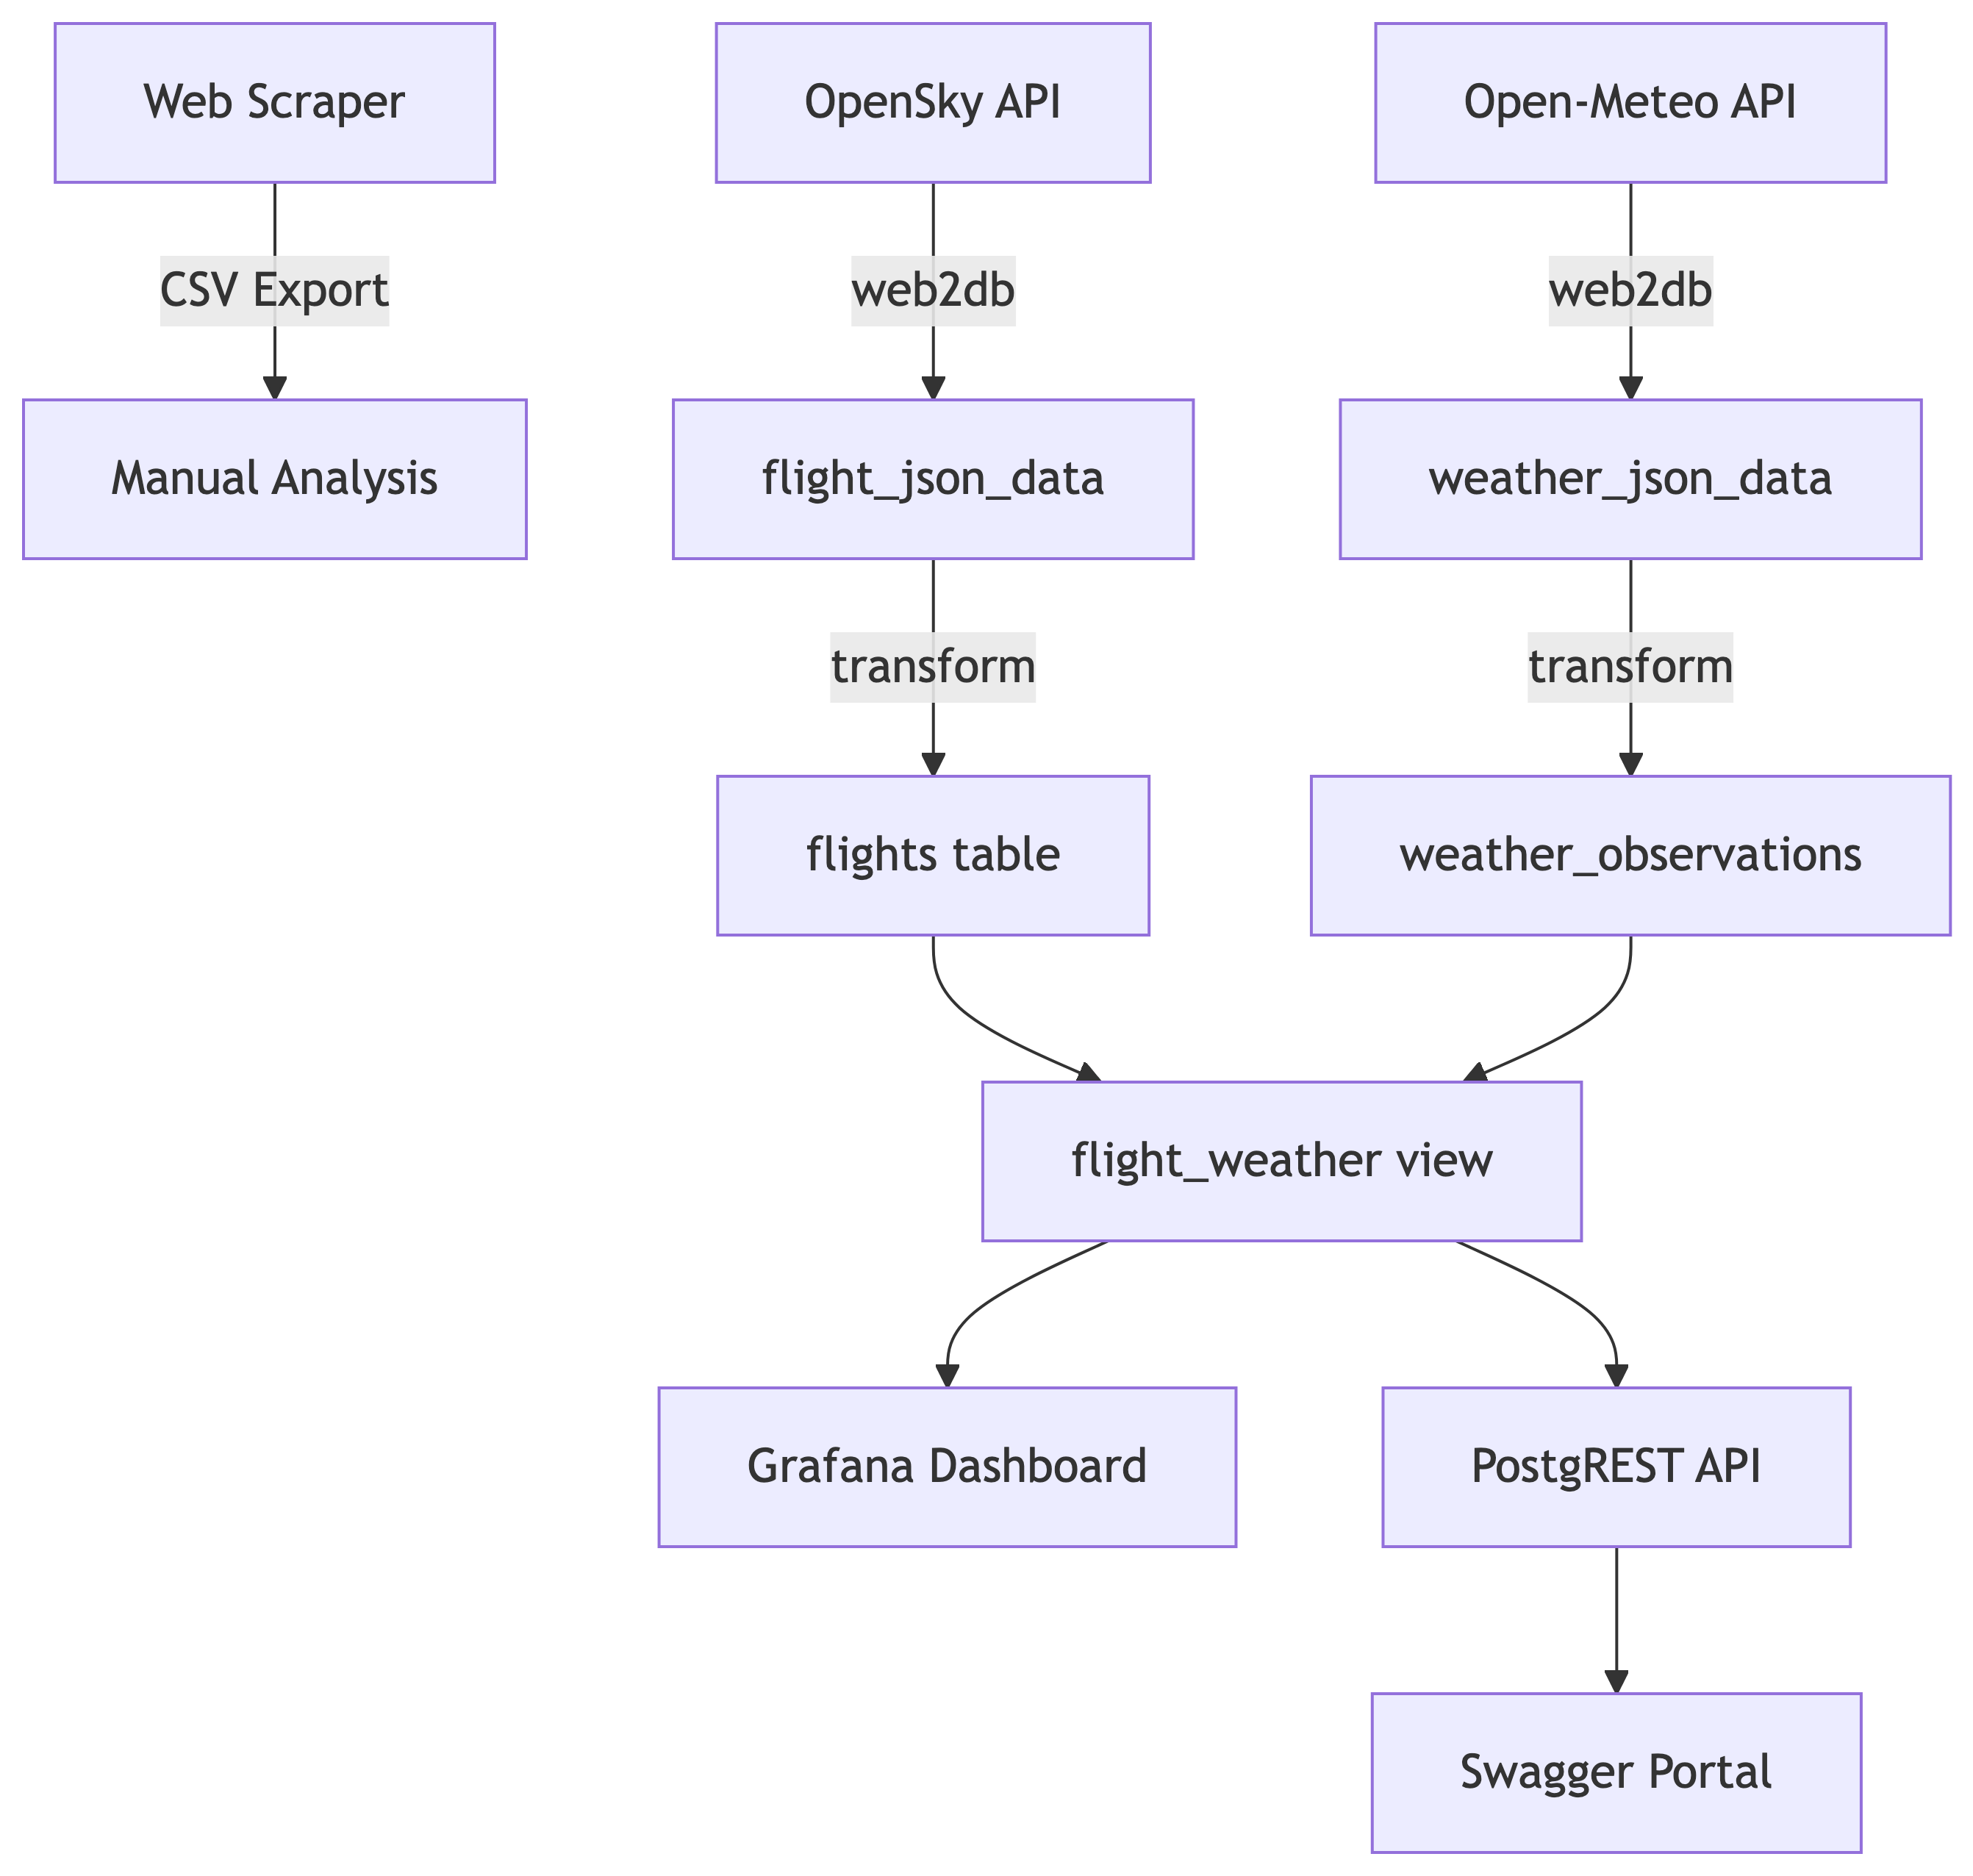
Seven Services, One Pipeline
| Stage | Service | Purpose |
|---|---|---|
| 1 | PostgreSQL | Central data store |
| 2a | web2db (flights) | Flight data ingestion |
| 2b | web2db (weather) | Weather data ingestion |
| 3 | db_transform | JSON to structured tables |
| 4 | Grafana | Visualization dashboard |
| 5 | PostgREST | REST API from database |
| 6 | Swagger UI | API documentation portal |
References
References
- Web Scraper Documentation. https://webscraper.io/documentation
- Discogs Search. https://www.discogs.com
- Docker Documentation. https://docs.docker.com
- Railway Documentation. https://docs.railway.app
- PostgreSQL JSON Functions. https://www.postgresql.org/docs/current/functions-json.html
- OpenSky Network API. https://opensky-network.org/apidoc/rest.html
- Open-Meteo API. https://open-meteo.com/en/docs
- PostgREST Documentation. https://postgrest.org
- Swagger UI. https://swagger.io/tools/swagger-ui/
- Grafana Documentation. https://grafana.com/docs/
- Crontab Guru. https://crontab.guru/
- Beekeeper Studio. https://www.beekeeperstudio.io/